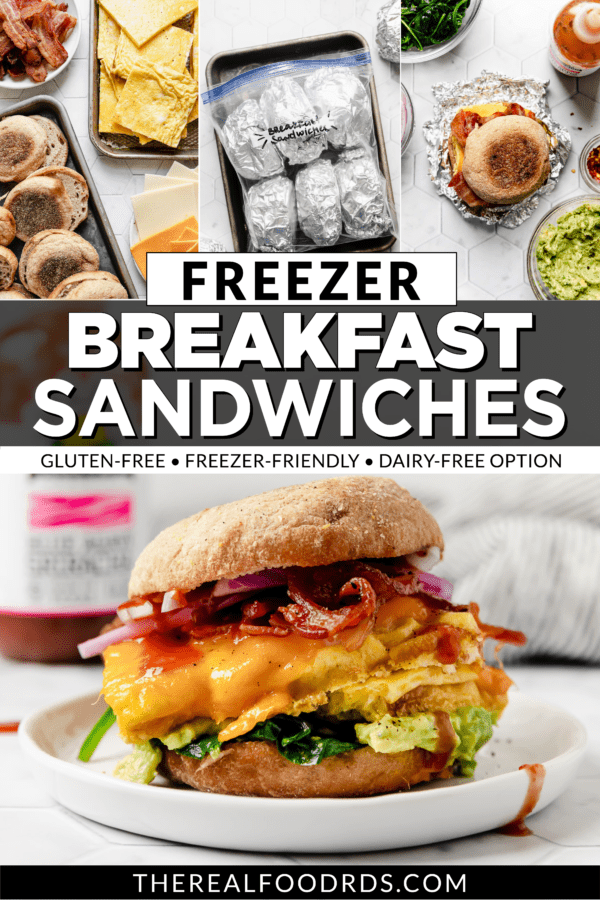
Everyone loves a hot breakfast, but sometimes you’re short on time or would rather catch a few more minutes of shut-eye than make breakfast. That’s why we’re sharing these incredibly easy, make-ahead Freezer Breakfast Sandwiches. You can make a dozen sandwiches at once, and customize them to suit your preferences! We’re also sharing several methods for reheating them so you can choose the method that works best for you.
Skip the drive-thru and instead stock your freezer with these Make-Ahead Breakfast Sandwiches
While it may be tempting to just slip into the drive-thru line at your local fast-food establishment or coffee shop to grab a hot-and-ready handheld breakfast, you’ll find that the cost of doing so quickly adds up! Especially when you’ve got a family to feed.
These Freezer Friendly Breakfast Sandwiches are the answer to your breakfast prayers. You can make a dozen at once and stock your freezer with them, so you’ll always have a delicious and satisfying breakfast that’s ready when you are.
Whether you’re commuting, taking a day trip to the beach or mountains, feeding a house full of guests, or just don’t want to mess with making breakfast on busy mornings, these breakfast sandwiches are going to become your breakfast BFF!

Ingredients for Make-Ahead Breakfast Sandwiches
- Large eggs
- Milk of choice – for dairy-free choose plain non-dairy milk such as unsweetened almond milk
- English muffins – for Gluten-free we like Canyon Bakehouse English Muffins
- Bacon or sliced ham – we’ve tried these sandwiched with bacon and sliced ham and both are great!
- Sliced cheddar cheese – feel free to substitute your favorite cheese or omit the cheese for dairy-free. Cheddar, Swiss, and pepper jack are particularly delicious.
- Fine salt and pepper
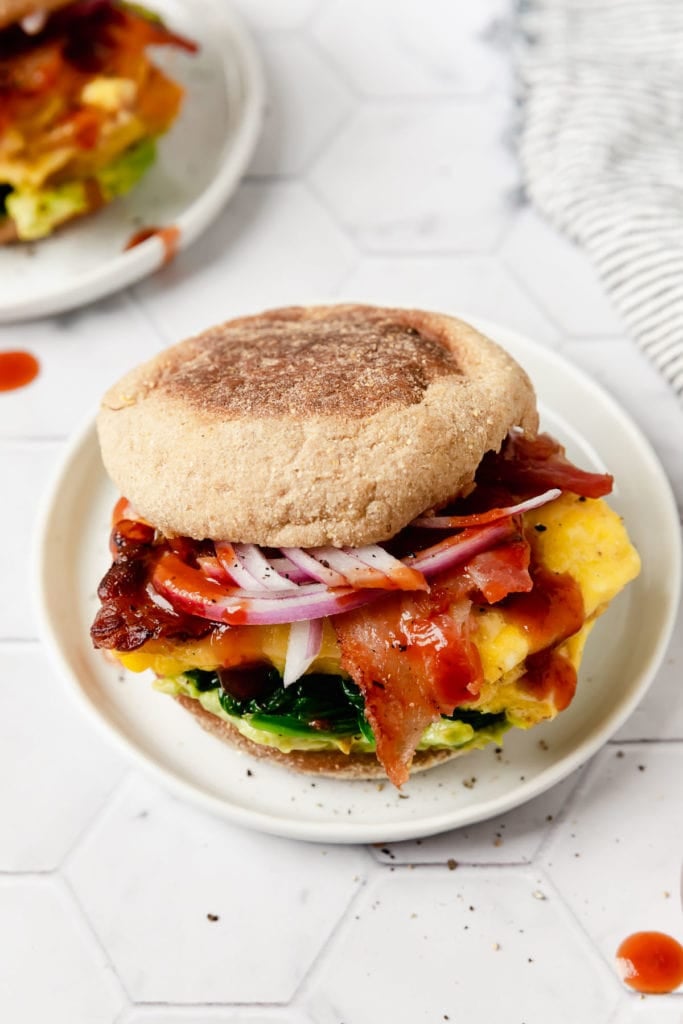
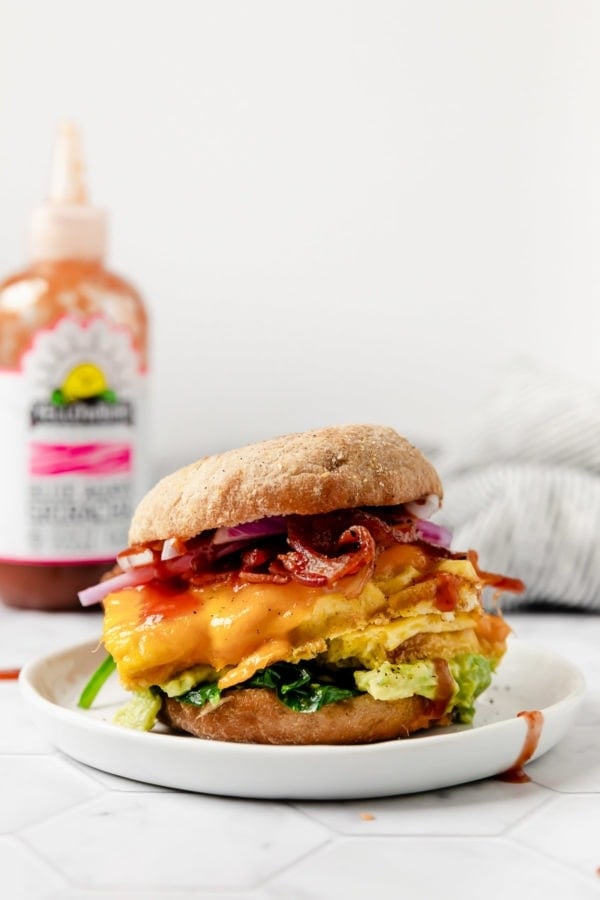
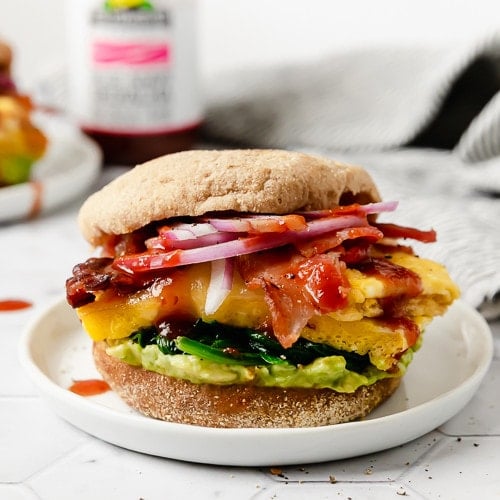
- Optional for serving – after you heat the breakfast sandwiches, you can add additional if you would like. We like sautéed spinach, sliced tomatoes, red onion or Quick Pickled Onions, sliced or mashed avocado, hot sauce, and/or red pepper flakes
Confused about different labels on eggs? Check this post out to learn all about choosing quality eggs.
How to make Frozen Breakfast Sandwiches
Step 1: Preheat the oven to 350℉ and grease a large, rimmed baking sheet (11×17-inch) with butter. Set aside.
Step 2: In a large bowl, whisk together eggs and milk. Season with salt and pepper, then pour whisked egg mixture into the prepared baking sheet and bake for 10-12 minutes or until the egg is set and slightly puffed no longer jiggly in the center.
Step 3: While the eggs are baking, place 12 English muffin halves face-up on another large baking sheet. Top each with 1 slice of bacon (cut into 2 pieces) or a slice of ham. Then top each muffin with a slice of cheese.
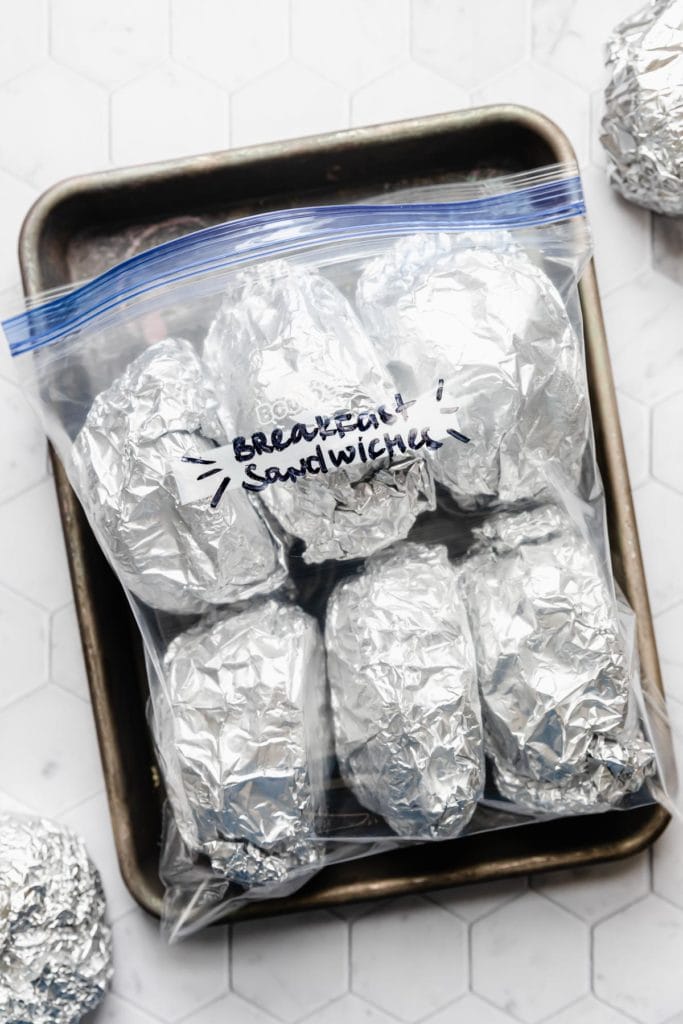
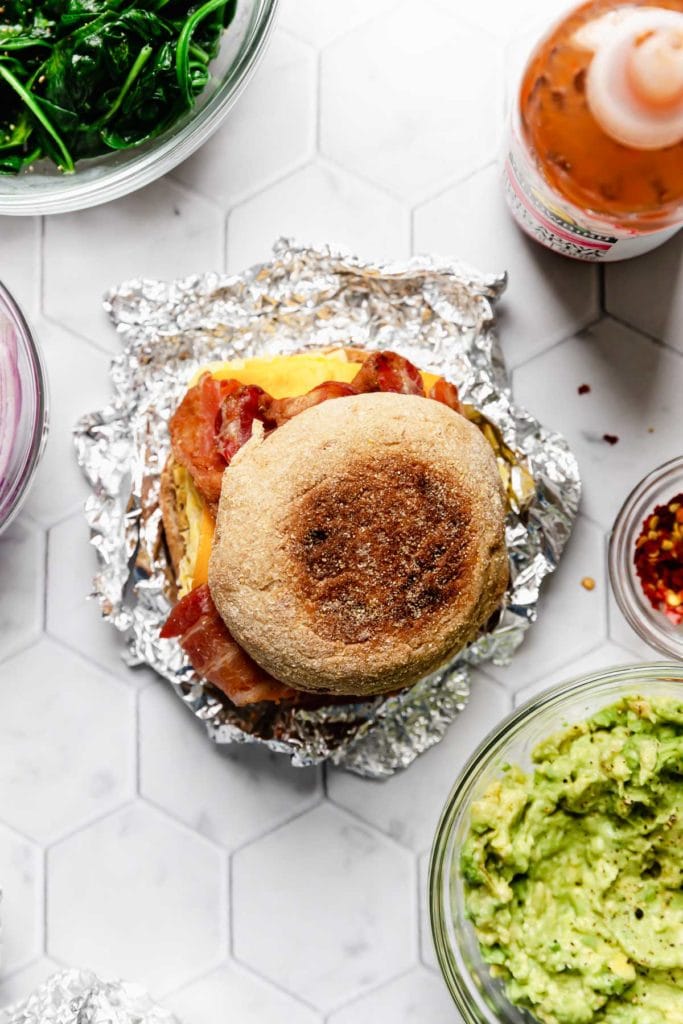
Step 4: After the eggs have finished cooking and cooled slightly, use a knife to cut the eggs into 12 equal portions. Then, top each muffin with an egg patty and the other half of the English muffin. Allow egg sandwiches to cool for 20 minutes before wrapping each one with foil. Place wrapped sandwiches back on the baking sheet and freeze until solid. Transfer sandwiches to a large plastic zip-top bag or another freezer-safe container for storage.
Store the breakfast sandwiches tightly wrapped in the freezer for up to 3 months.
How to reheat Freezer Breakfast Sandwiches
Reheating your breakfast sandwiches is easy to do. Just choose the method that works best for you!
To reheat sandwiches:
- From Thawed: Place the desired number of foil-wrapped sandwiches in the refrigerator to thaw overnight before reheating. In a preheated 350℉ oven or toaster oven, heat the foiled wrapped sandwiches for 20 minutes or until heated through.
- To reheat in the microwave: first remove foil from the thawed sandwich(es). Then, wrap each sandwich lightly in a paper towel and microwave for 1 ½ – 2 minutes or until heated through.
- From Frozen: Place foil-wrapped breakfast sandwich(es) in a preheated 350℉ oven or toaster oven for 30-35 minutes or until heated through.
- To reheat in the microwave: first remove foil from the frozen sandwich(es). Then, wrap each sandwich lightly in a paper towel and microwave for 3 minutes or until heated through.
Other Make-Ahead Breakfast recipes you’ll love:
Sweet Potato Turkey Sausage Egg Bake
Sausage Hash Brown Egg Muffins
Butternut Squash and Apple Hash with Sausage
Make-Ahead Freezer Breakfast Sandwiches
Start your day right with these make-ahead breakfast sandwiches for easy mornings or a fun way to feed a crowd. Just grab one from the freezer and skip the drive-thru!
Ingredients
- 18 large eggs
- ⅓ cup milk of choice
- 12 English muffins, toasted if desired (use gluten-free if desired)
- 12 slices bacon, cooked as desired, or 12 ounces sliced ham
- 12 slices cheddar cheese (omit for dairy-free)
- Salt and black pepper
Optional for serving: Fresh spinach, sliced tomatoes and/or red onion, sliced or mashed avocado, hot sauce, red pepper flakes, etc.
Instructions
- Preheat oven to 350℉.
- Grease a large, rimmed baking sheet with butter. Set aside.
- In a large bowl, whisk together eggs and milk. Season with salt and pepper.
- Pour whisked egg mixture into the prepared baking sheet and bake for 10-12 minutes or until the egg is set and slightly puffed no longer jiggly in the center.
- While the eggs are baking, place 12 English muffin halves face-up on another large baking sheet. Top each with 1 slice of bacon (cut into 2 pieces) or a slice of ham. Top each muffin with a slice of cheese.
- Using a knife to cut the eggs into 12 equal portions. Top each muffin with an egg patty and the other half of the English muffin. Allow egg sandwiches to cool for 20 minutes before wrapping each one with foil. Place wrapped sandwiches back on the baking sheet and freeze until solid. Transfer sandwiches to a large plastic zip-top bag or another freezer-safe container for storage.
- Store up to 3 months in the freezer.
To reheat:
- From Thawed: Place the desired number of foil-wrapped sandwiches in the refrigerator to thaw overnight before reheating. In a preheated 350℉ oven or toaster oven, heat the foiled-wrapped sandwiches for 20 minutes or until heated through.
- To reheat in the microwave: Remove foil from the thawed sandwich(es). Wrap sandwich lightly in a paper towel and microwave for 1 ½ – 2 minutes or until heated through.
- From Frozen: Place foil-wrapped breakfast sandwich(es) in a preheated 350℉ oven or toaster oven for 30-35 minutes or until heated through.
- To reheat in the microwave: Remove foil from the frozen sandwich(es). Wrap sandwich lightly in a paper towel and microwave for 3 minutes or until heated through.
- Serve with fresh spinach, sliced tomatoes and/or red onion, sliced or mashed avocado and/or hot sauce if desired.
Last Step! Please leave a review and rating letting us know how you liked this recipe! This helps our business thrive so we can continue providing free recipes and high-quality content for you.
Nutrition Information
- Serving Size: 1 sandwich with bacon and cheese
- Calories: 319
- Fat: 14
- (Sat Fat: 6)
- Sodium: 552
- Carbohydrate: 30
- (Fiber: 2
- Sugar: 2)
- Protein: 18
- Cholesterol: 232
Dietary
Pin it now, Make it later!
All photos and content are copyright protected. Please do not use our photos without prior written permission. If you wish to republish this recipe, please rewrite the recipe in your own unique words and link back to the source recipe here on The Real Food Dietitians. Thank you!
Photo Credit: The photos in this blog post were taken by Jess of Plays Well with Butter.


I made a batch of these for meal prep this week and love the convenience. I add lettuce/arugula, tomato, bell pepper slices and Tabasco sauce. I want to add avocado but it hasn’t made it in the sandwich yet.
The only trouble that we’ve had was with the microwave times. 1 1/2 minutes for a refrigerated sandwich waayyy too much time I found that 30-40 seconds is plenty of time to warm without making the egg rubbery.
We are glad you found a warm up method that works for you! Thanks for the feedback Amy!
From one ‘Amy’ to another, I agree. Love these sandwiches…so convenient! However, I reheated mine in the microwave for 3 minutes from frozen as per the recipe and 3 minutes was too long. The egg was rubbery and the ham and english muffin dried out. Perhaps a lower power setting should be indicated? Anyway, I will continue to play with the microwave time and maybe the power level too and will report back when I’ve found the right time/power setting that works best.
Has anyone tried reheating these on a Blackstone Griddle? Right In the foil?
Hi Lori, yes you can reheat these nicely on a griddle right in the foil wrappers.
Great flavor! We added spinach and onions and baked with the eggs. Thought about a switch up and using breakfast sausage on occasion. This will become part of our weekly meal prep
We are thrilled this will be a repeat on the menu Mandy! Thanks for the feedback and 5-star review!